
Now then, back to the I Am A Moron Project!
The following posts were previously posted on Possumblog, since this joint was all busted up. Since it's more of a general audience type blog, some of the more technical aspects of my travail are sort of glossed over, and some of the information below might seem a bit repetitive, so my apologies for that.
Let me say one thing, though--if you don't have the proper tools, it's best not to attempt the timing belt change. I know, I know--there are lots of people who do this and can do it backwards and forwards blindfolded, but if you've not done it before (like yours truly), not having the right tools makes a three hour job stretch out to an entire MONTH. Get a camshaft sprocket counterhold, if you can find one--Volvo part 9995034. If you can't find one of those, find one like I mention below. You'll be glad you did, and save yourself a lot of frustration. Also, although it might seem price, I would be sure and get the crankshaft counterhold tool as well. That nut's tough, and having the right tool made it very simple to remove.
ANYWAY, to begin:
Georgia dirt kicker and graphic technology guru Dave Helton sends a note mocking me for falling to #3 in the Google rankings for "moron project," having been usurped by some sort of garage band of the same name. In order to reestablish my bona fides, I will note that the tool I have been anxiously awaiting in order to hold the sprocket on the front of my engine arrived yesterday! It's a nice piece of work--sturdy, heavy, and well made. Got home with it, and found that the two cylindrical pegs on the end of it that are intended to fit in the holes in the sprocket are too big. Meaning I will have to get out my grinder and attempt to reduce their diameter. ::sigh::
HOWEVER, not to be outdone, I did go ahead and do some other necessary work on the ol' lump of iron yesterday, installing a small plate on the rear of the cylinder head to prevent the rear seal from popping out, and installing a flame trap relocation kit. I am going to do a more detailed post on this over on Revolvoblog (in order to keep you from slashing your wrists in despair from having to read about car repair) but the short version is that the flame trap is a little bit of plastic in the crankcase vent system. In the original version, this is located way down beside the starter, underneath the intake manifold, stuffed between three inaccessible metal objects, turned sideways, and guarded by a dwarf with a battle axe. Meaning it's nearly impossible to get to it, which is bad, because the thing can get plugged up with oil, and if that happens, it can cause the pressure inside the crankcase to get real high, and it can cause the engine seals to pop out and leak oil everywhere. Which is exactly what happened to me.
I wasn't sure it was a plugged up flame trap, though. But I figured I would go ahead and check it, and also install a kit to move the hateful thing up onto the topside of the engine where it will be easier to change out in the future.
After much wrestling and mild oaths, I did manage to get it free, and sure enough, the thing was nearly completely blocked. The photo below shows the old one on the left, and the new one on the right.

The old one used to be the color of the new one. This shows just how blocked up it was--I have a feeling it hadn't been changed in about 100,000 miles or so. And to be something that only costs about five bucks, it sure has wound up costing me a ton of money.
(Second post, as a follow-up to this one, and again, originally published over on Possumblog.)
I got home yesterday and set in to once and for all get the Volvo stuck back together. After changing out of my good clothes and into my evil ones, the first task was to modify my brand new sprocket-holding tool (in Swedish, kugghjulhållareverktyg) with the wrong thing to use for tool modification. As you may or may not recall, the thing I bought looks like this--
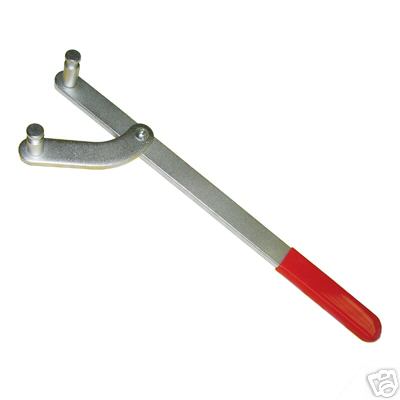
The little pegs on the end fit into small holes on the web of the timing belt gears, so you can hold it still while you struggle mightily to break the bolt loose that holds everything together. One sprocketwheel I had managed to set free, but the other was stuck tight, and I couldn’t find anyplace on the engine to make the thing be still to turn the bolt, thus the need for this supposedly “universal” tool. As I mentioned Tuesday, however, upon receipt of the tool, I found that the little pegs were too big to go into the required holes.
Meaning I would have to somehow make them smaller.
Meaning an opportunity to let my skills in expedient engineering shine brightly!
Best thing to use would have been a small, handheld die grinder (think of a souped-up Dremel tool) of some sort. I don’t have one of those. Next best would have been a bench grinder. I don’t have one of those.
What I DO have is a big industrial handheld grinder that had belonged to my dad that he used for grinding welds. It’s powerful enough to make the whole house go dim whenever it’s turned on, and the torque builds up such a strong gyroscopic force that it’s very difficult to move into another plane (other than the allowing it to precess around its central axis) while you’re holding it. Which means it’s really not the thing for small, more delicate work. But when you have no choice…
I chucked the tool into my giant vise and set to work, and in only minutes of barely-controlled metal grinding and a shower of bright hot sparks, I had succeeded in gnawing the ends off the pegs enough that they would fit into the holes.
Yay.
Now then, on to the part that matters--I placed my pegs in the holes, held on tightly, got out my big socket wrench, heaved mightily on the bolt, and…
It came free! FREE AT LAST!
Finally, after a month of dawdling and looking at a non-functional automobile on the driveway, I might finally be on the way to getting the thing fixed!
Off with the gear, and in a bit of a surprise, the little seal on the shaft behind it simply fell out. Seals aren’t supposed to do that--you’re supposed to have to pry them out. This might be why it leaked so very much. (Duh.)
I pried out the other seal on the camshaft, cleaned everything with a Q-tip, lubed up the shafts, got my new seals, put some oil on them, and gently tapped them into place. Back on with the gears, and once again employed my marvelously mangled tool to hold them still while I gorilla’d the bolts tight with the torque wrench. Which began the process of making my whole upper body sorta achy today.
Now then--do I remember how the rest of it goes back together?
Sorta.
Let’s see--uhmm, the lower crankshaft gear has a couple of big washers….and they have to line up right on the timing mark. Hmm. That required some fixing and doing before I finally got it back to where it was supposed to be. Now then, to make sure everything ELSE is lined up!
The camshaft, the intermediate shaft, and the crankshaft are all supposed to be lined up exactly right, or else the car won’t run right after the timing belt is put on. This alignment is “aided” by a tiny dimple on the camshaft gear and on the intermediate gear that are supposed to be lined up with two invisible marks molded into the plastic camshaft cover. The top one is easy enough to see, but the middle one requires the use of a hand mirror to make absolutely sure it’s lined up right. The bottom cog on the crankshaft has a tiny divot notched into the washer, and THAT is supposed to align with a timing mark imperceptibly molded into the front of the engine. Believe it or not, I actually managed to get them all in line.
Of course, then there’s the issue of the belt itself.
See, it has little teeth on it, and they have to be threaded onto each of the teeth of the gears, WITHOUT MOVING THE GEARS OUT OF POSITION. Made all the more difficult by the fact that it’s not quite loose enough to do this without moving everything the wrong way. But with some great patience and even while being spoken to by my kind wife who’d just gotten home and wanted to fill me in on her day and her plans for supper as I was hunkered over the front of the radiator cutting off the circulation to my lower torso and sweating such copious amounts of sweat that I appeared to be a lawn sprinkler and was covered from fingertip to elbow in that blasted sticky black grime, I still managed to scootch the belt over the three gears successfully! All three gears lined up, marks on the belt lined up with the gears! Let loose the new idler pulley I’d installed earlier, and it was all nice and tight and just like new.
Next?
Uhhmmmm. Hmm. Oh, yeah, there’s the lower cover to put on--another grimy bit of black plastic that I had to scrape clean before putting back on. Next, I think would be…yes, it would be the big bottom pulley and dampener that had required the purchase of yet ANOTHER tool before I got it off in the first place.
Put the pulley on, connect the required tool, and with great and mighty exertions and grunts and squeals that sounded like a replay of the recent women’s tennis tournament at the All England Club, I managed to get the crankshaft nut torqued down to something close to the specified foot-poundage.
By golly, this thing is almost put back together!
And for some reason, all the muscles in my chest hurt!
On with the upper timing belt cover (and I’m missing the top screw, which probably rolled away a month ago) and now time for the accessory drive belts. Two for the alternator, and one for the A/C compressor.
Ah, yes--the hateful compressor.
Just as I had nearly not gotten the belt OFF of it when I was tearing things apart, I very nearly couldn’t get the new one ON it. And thus the greatest exhaustion and aches began, as I worked for nearly a half hour, grunting and heaving and pulling and pushing and tugging and jerking and crawling underneath and repeating the grunting-heaving procedure until FINALLY I got it loose enough to slide on the pulleys. The alternator belts came next, and they were a breeze, which is good, because by now I was full of weariness and frustration, and I was completely empty of sweat, having gotten rid of enough to fill a bathtub.
I left the belts loose on the alternator, and the mounting bolts loose on both it and the compressor and put all my tools away for the night. Next step is to finish tightening them up, installing the fan and fan shroud, hooking the battery back up, filling it with oil, and doing a test crank. That’s all for another day, though. By the time I got inside and got the majority of the grime off of my arms, it was nearly 9:00 o’clock, and I was so whupped I couldn’t bring myself to eat supper.
Luckily, lest I become Mr. Lazybones, there were other chores to be done--seems that there was cookies to be baked for something Ashley’s doing, so she and Mom were busily doing that, which left me to go get some laundry from upstairs, because there was a need for an emergency load to be washed and dried RIGHT THEN so it could be worn today by a certain teenager (who, as I mentioned, was quite involved with cookie-making) and then there was the nearly overwhelming chore of getting a certain Tiny Terror in the tub for her bath. Made all the more difficult by her seeming inability to keep from coming downstairs to see if any cookies were ready and to look out the door at the kitten.
By the time I finally got a shower and got in bed, my head was throbbing and my chestal muscles felt like hot cooked lasagna noodles.
As I said, thank goodness this morning’s meeting was short.
Let me say one thing, though--if you don't have the proper tools, it's best not to attempt the timing belt change. I know, I know--there are lots of people who do this and can do it backwards and forwards blindfolded, but if you've not done it before (like yours truly), not having the right tools makes a three hour job stretch out to an entire MONTH. Get a camshaft sprocket counterhold, if you can find one--Volvo part 9995034. If you can't find one of those, find one like I mention below. You'll be glad you did, and save yourself a lot of frustration. Also, although it might seem price, I would be sure and get the crankshaft counterhold tool as well. That nut's tough, and having the right tool made it very simple to remove.
ANYWAY, to begin:
Georgia dirt kicker and graphic technology guru Dave Helton sends a note mocking me for falling to #3 in the Google rankings for "moron project," having been usurped by some sort of garage band of the same name. In order to reestablish my bona fides, I will note that the tool I have been anxiously awaiting in order to hold the sprocket on the front of my engine arrived yesterday! It's a nice piece of work--sturdy, heavy, and well made. Got home with it, and found that the two cylindrical pegs on the end of it that are intended to fit in the holes in the sprocket are too big. Meaning I will have to get out my grinder and attempt to reduce their diameter. ::sigh::
HOWEVER, not to be outdone, I did go ahead and do some other necessary work on the ol' lump of iron yesterday, installing a small plate on the rear of the cylinder head to prevent the rear seal from popping out, and installing a flame trap relocation kit. I am going to do a more detailed post on this over on Revolvoblog (in order to keep you from slashing your wrists in despair from having to read about car repair) but the short version is that the flame trap is a little bit of plastic in the crankcase vent system. In the original version, this is located way down beside the starter, underneath the intake manifold, stuffed between three inaccessible metal objects, turned sideways, and guarded by a dwarf with a battle axe. Meaning it's nearly impossible to get to it, which is bad, because the thing can get plugged up with oil, and if that happens, it can cause the pressure inside the crankcase to get real high, and it can cause the engine seals to pop out and leak oil everywhere. Which is exactly what happened to me.
I wasn't sure it was a plugged up flame trap, though. But I figured I would go ahead and check it, and also install a kit to move the hateful thing up onto the topside of the engine where it will be easier to change out in the future.
After much wrestling and mild oaths, I did manage to get it free, and sure enough, the thing was nearly completely blocked. The photo below shows the old one on the left, and the new one on the right.
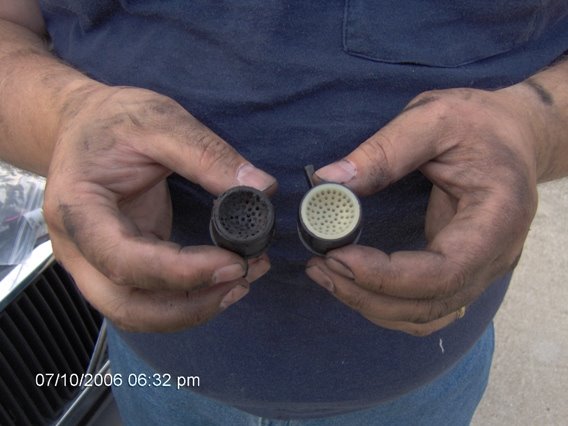
The old one used to be the color of the new one. This shows just how blocked up it was--I have a feeling it hadn't been changed in about 100,000 miles or so. And to be something that only costs about five bucks, it sure has wound up costing me a ton of money.
(Second post, as a follow-up to this one, and again, originally published over on Possumblog.)
I got home yesterday and set in to once and for all get the Volvo stuck back together. After changing out of my good clothes and into my evil ones, the first task was to modify my brand new sprocket-holding tool (in Swedish, kugghjulhållareverktyg) with the wrong thing to use for tool modification. As you may or may not recall, the thing I bought looks like this--
The little pegs on the end fit into small holes on the web of the timing belt gears, so you can hold it still while you struggle mightily to break the bolt loose that holds everything together. One sprocketwheel I had managed to set free, but the other was stuck tight, and I couldn’t find anyplace on the engine to make the thing be still to turn the bolt, thus the need for this supposedly “universal” tool. As I mentioned Tuesday, however, upon receipt of the tool, I found that the little pegs were too big to go into the required holes.
Meaning I would have to somehow make them smaller.
Meaning an opportunity to let my skills in expedient engineering shine brightly!
Best thing to use would have been a small, handheld die grinder (think of a souped-up Dremel tool) of some sort. I don’t have one of those. Next best would have been a bench grinder. I don’t have one of those.
What I DO have is a big industrial handheld grinder that had belonged to my dad that he used for grinding welds. It’s powerful enough to make the whole house go dim whenever it’s turned on, and the torque builds up such a strong gyroscopic force that it’s very difficult to move into another plane (other than the allowing it to precess around its central axis) while you’re holding it. Which means it’s really not the thing for small, more delicate work. But when you have no choice…
I chucked the tool into my giant vise and set to work, and in only minutes of barely-controlled metal grinding and a shower of bright hot sparks, I had succeeded in gnawing the ends off the pegs enough that they would fit into the holes.
Yay.
Now then, on to the part that matters--I placed my pegs in the holes, held on tightly, got out my big socket wrench, heaved mightily on the bolt, and…
It came free! FREE AT LAST!
Finally, after a month of dawdling and looking at a non-functional automobile on the driveway, I might finally be on the way to getting the thing fixed!
Off with the gear, and in a bit of a surprise, the little seal on the shaft behind it simply fell out. Seals aren’t supposed to do that--you’re supposed to have to pry them out. This might be why it leaked so very much. (Duh.)
I pried out the other seal on the camshaft, cleaned everything with a Q-tip, lubed up the shafts, got my new seals, put some oil on them, and gently tapped them into place. Back on with the gears, and once again employed my marvelously mangled tool to hold them still while I gorilla’d the bolts tight with the torque wrench. Which began the process of making my whole upper body sorta achy today.
Now then--do I remember how the rest of it goes back together?
Sorta.
Let’s see--uhmm, the lower crankshaft gear has a couple of big washers….and they have to line up right on the timing mark. Hmm. That required some fixing and doing before I finally got it back to where it was supposed to be. Now then, to make sure everything ELSE is lined up!
The camshaft, the intermediate shaft, and the crankshaft are all supposed to be lined up exactly right, or else the car won’t run right after the timing belt is put on. This alignment is “aided” by a tiny dimple on the camshaft gear and on the intermediate gear that are supposed to be lined up with two invisible marks molded into the plastic camshaft cover. The top one is easy enough to see, but the middle one requires the use of a hand mirror to make absolutely sure it’s lined up right. The bottom cog on the crankshaft has a tiny divot notched into the washer, and THAT is supposed to align with a timing mark imperceptibly molded into the front of the engine. Believe it or not, I actually managed to get them all in line.
Of course, then there’s the issue of the belt itself.
See, it has little teeth on it, and they have to be threaded onto each of the teeth of the gears, WITHOUT MOVING THE GEARS OUT OF POSITION. Made all the more difficult by the fact that it’s not quite loose enough to do this without moving everything the wrong way. But with some great patience and even while being spoken to by my kind wife who’d just gotten home and wanted to fill me in on her day and her plans for supper as I was hunkered over the front of the radiator cutting off the circulation to my lower torso and sweating such copious amounts of sweat that I appeared to be a lawn sprinkler and was covered from fingertip to elbow in that blasted sticky black grime, I still managed to scootch the belt over the three gears successfully! All three gears lined up, marks on the belt lined up with the gears! Let loose the new idler pulley I’d installed earlier, and it was all nice and tight and just like new.
Next?
Uhhmmmm. Hmm. Oh, yeah, there’s the lower cover to put on--another grimy bit of black plastic that I had to scrape clean before putting back on. Next, I think would be…yes, it would be the big bottom pulley and dampener that had required the purchase of yet ANOTHER tool before I got it off in the first place.
Put the pulley on, connect the required tool, and with great and mighty exertions and grunts and squeals that sounded like a replay of the recent women’s tennis tournament at the All England Club, I managed to get the crankshaft nut torqued down to something close to the specified foot-poundage.
By golly, this thing is almost put back together!
And for some reason, all the muscles in my chest hurt!
On with the upper timing belt cover (and I’m missing the top screw, which probably rolled away a month ago) and now time for the accessory drive belts. Two for the alternator, and one for the A/C compressor.
Ah, yes--the hateful compressor.
Just as I had nearly not gotten the belt OFF of it when I was tearing things apart, I very nearly couldn’t get the new one ON it. And thus the greatest exhaustion and aches began, as I worked for nearly a half hour, grunting and heaving and pulling and pushing and tugging and jerking and crawling underneath and repeating the grunting-heaving procedure until FINALLY I got it loose enough to slide on the pulleys. The alternator belts came next, and they were a breeze, which is good, because by now I was full of weariness and frustration, and I was completely empty of sweat, having gotten rid of enough to fill a bathtub.
I left the belts loose on the alternator, and the mounting bolts loose on both it and the compressor and put all my tools away for the night. Next step is to finish tightening them up, installing the fan and fan shroud, hooking the battery back up, filling it with oil, and doing a test crank. That’s all for another day, though. By the time I got inside and got the majority of the grime off of my arms, it was nearly 9:00 o’clock, and I was so whupped I couldn’t bring myself to eat supper.
Luckily, lest I become Mr. Lazybones, there were other chores to be done--seems that there was cookies to be baked for something Ashley’s doing, so she and Mom were busily doing that, which left me to go get some laundry from upstairs, because there was a need for an emergency load to be washed and dried RIGHT THEN so it could be worn today by a certain teenager (who, as I mentioned, was quite involved with cookie-making) and then there was the nearly overwhelming chore of getting a certain Tiny Terror in the tub for her bath. Made all the more difficult by her seeming inability to keep from coming downstairs to see if any cookies were ready and to look out the door at the kitten.
By the time I finally got a shower and got in bed, my head was throbbing and my chestal muscles felt like hot cooked lasagna noodles.
As I said, thank goodness this morning’s meeting was short.
posted by Terry at 7/13/2006 01:42:00 PM
![]()
![]()

0 Comments:
Post a Comment
<< Home