
A place to rest your head.
The weekend past was one of great fun and exhaustion, especially exhaustion. Let me tell you, working on a car in the middle of the summer in the middle of the afternoon can be rather hot.
ANYway, it was time to install the headrests I purchased last week. They have been liberally doused with vinyl reconditioner to keep them nice and squishy, and I was pretty much all ready to go, although I wasn't exactly clear on the process, never having done it before nor having anything really to go by.
So, here we go--BUT FIRST, a disclaimer. Nothing in the following is intended to be official information of any sort, and any work you do is at your own risk. In other words, don't try to blame me if you mess something up. Second, it is not a good idea to remove and relocate safety equipment from one car to another, and it can, in fact, be more dangerous than just leaving well enough alone. Caveat mechanicus.
Now then, why do this in the first place? Well, I don't know, other than the fact that I like the added safety of the rear headrests, and I think the car looks better with them. That's pretty much it. That, and they can be added easily. More or less.
Anyway, the first step (after getting the headrests, that is) is to have your tools at the ready--a 10mm wrench and an X-Acto #11 blade and handle.
Begin by removing the bottom cushion of the seat by grabbing it in the middle back by the armrest, and pushing back slightly and pulling up to get the metal retaining bar unhooked from the body-mounted hook in the floor. Tilt the cushion forward and take it out. Good time to clean it, by the way.
And a good time to take stock of all the junk that can accumulate under a seat cushion. Mine had a couple of pencils, and an assortment of "loose" change. Loose in quotes, because it was gummed solid to the floorpan by some sort of gummy gooey gum. I thought briefly about prying the stuff up, but I figured I'd leave that for the next owner. Here's what I found.
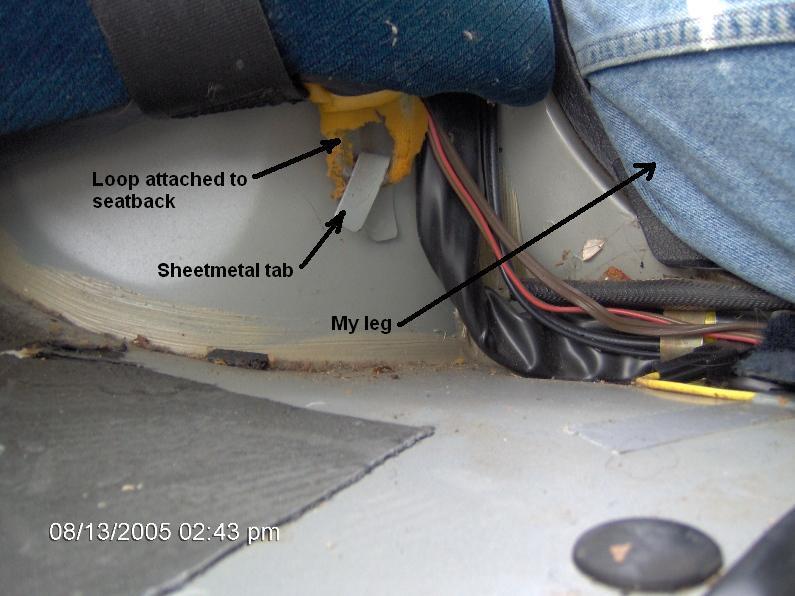
Next, the rear seatback has to be removed--there are two metal loops on each side down by the floor (here's the one on the driver's side) held in place by two sheetmetal tabs (like this). Bend the tabs up, gently pull the bottom of the cushion outward to clear the tabs, then quickly lift the seatback upward. This might require a bump or two from your hand or a couple of tugs in order to get the metal loops on the rear of the seat up out of the body-mounted metal hooks attached to the rear bulkhead.
Lay the seat aside (again, a nice time to clean it) and then you're ready to start the fun part. Inside the trunk are four small black metal spring-clip buttons that hold the fiberboard trim panel in place. Pop these buttons out and put them in your spare parts tray. The holes they came out of will be the mounting holes for the headrest brackets.
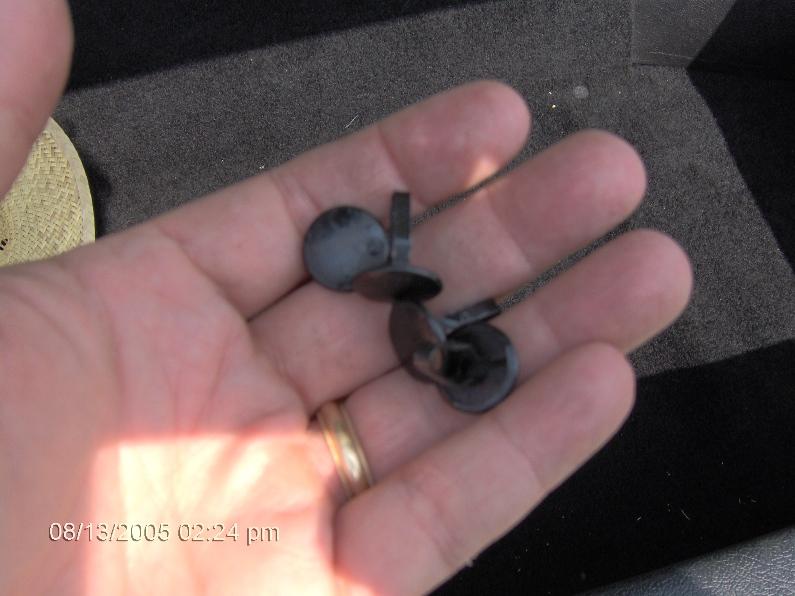
I mentioned the other day about the clips that hold the brackets on the support rods--this is a picture of one of them. Just press slightly and after the notch in the support rod has cleared the retainer, the brackets (or the headrests) come right off.
Take each bracket, and reaching into the trunk from the inside of the passenger compartment and through the trunk pass-through, place the nylon upper end of the bracket into the hole in the parcel shelf that is directly above the little hole where the button came out. This picture shows the passenger side location. The bottom end of the bracket with the threaded portion should then fit right into the small hole. This might take a bit of fidgeting and grunting to make them align just right, and in my case, I had to move a speaker wire out of the way so the fiber panel wouldn't stand out too far from the bulkhead. After the threaded portion pops through the bulkhead attach the nut and tighten. Repeat for the other three brackets. This is what they look like installed from the inside, and what they look like in the trunk.
Time now to make the cut into the fiberboard parcel shelf cover. Take a new X-Acto blade mounted into a handle and carefully press it into the fiberboard. Using the bushing in the mounting bracket below as a guide, carefully cut away the material to make a hole for each of the four support rods. Be careful not to nick the nylon bushings or to cut away more than necessary.
Clean up your mess, grab your headrests, and guide each support rod through the parcel shelf holes and into the bushings and press down firmly until they all click into place. Done!
Reinstall the rear seatback by hooking the metal loops over the hooks--this is much harder to do going in than it was coming off, and you have to make sure the hooks have actually caught and the seatback is firmly set. Place the loops at the bottom back over the retaining tabs and bend them back down, then reinstall the bottom cushion. After all that, everything should look like this.
Now then--difficulties. Yes, there were some. Mostly in not realizing the best sequence of destruction and reattachment, and the nigglesome problems of making sure things were out of the way. If you have your stuff together and follow the outline above, this is maybe a thirty minute job. However, if you maybe try to be smart and cut a hole out first before you install a bracket, it might make things last a bit longer. If you have one of the seatbelt buckles caught up under the rear seatback cushion when you go to install the lower one, and have to nearly disassemble everything just to get it out, it can take longer. If it's a thousand degrees inside the car and you're already tired and brain-dead from being out cutting grass in the blazing sun, it can take longer. So, be sure to have plenty of water around. And don't be silly and have to do things twice.
The only lingering problem is the rear speaker grills--these are the nice big factory accessory speakers with the cheesy metal ring around them, and they're a bit too big to fit in the shelf alongside the rubber boots for the headrests. So, I'm going to have to do a bit of fabrication to fix a suitable cover for the grills. I'm not too worried about that, though.
ANYway, it was time to install the headrests I purchased last week. They have been liberally doused with vinyl reconditioner to keep them nice and squishy, and I was pretty much all ready to go, although I wasn't exactly clear on the process, never having done it before nor having anything really to go by.
So, here we go--BUT FIRST, a disclaimer. Nothing in the following is intended to be official information of any sort, and any work you do is at your own risk. In other words, don't try to blame me if you mess something up. Second, it is not a good idea to remove and relocate safety equipment from one car to another, and it can, in fact, be more dangerous than just leaving well enough alone. Caveat mechanicus.
Now then, why do this in the first place? Well, I don't know, other than the fact that I like the added safety of the rear headrests, and I think the car looks better with them. That's pretty much it. That, and they can be added easily. More or less.
Anyway, the first step (after getting the headrests, that is) is to have your tools at the ready--a 10mm wrench and an X-Acto #11 blade and handle.
Begin by removing the bottom cushion of the seat by grabbing it in the middle back by the armrest, and pushing back slightly and pulling up to get the metal retaining bar unhooked from the body-mounted hook in the floor. Tilt the cushion forward and take it out. Good time to clean it, by the way.
And a good time to take stock of all the junk that can accumulate under a seat cushion. Mine had a couple of pencils, and an assortment of "loose" change. Loose in quotes, because it was gummed solid to the floorpan by some sort of gummy gooey gum. I thought briefly about prying the stuff up, but I figured I'd leave that for the next owner. Here's what I found.
Next, the rear seatback has to be removed--there are two metal loops on each side down by the floor (here's the one on the driver's side) held in place by two sheetmetal tabs (like this). Bend the tabs up, gently pull the bottom of the cushion outward to clear the tabs, then quickly lift the seatback upward. This might require a bump or two from your hand or a couple of tugs in order to get the metal loops on the rear of the seat up out of the body-mounted metal hooks attached to the rear bulkhead.
Lay the seat aside (again, a nice time to clean it) and then you're ready to start the fun part. Inside the trunk are four small black metal spring-clip buttons that hold the fiberboard trim panel in place. Pop these buttons out and put them in your spare parts tray. The holes they came out of will be the mounting holes for the headrest brackets.
I mentioned the other day about the clips that hold the brackets on the support rods--this is a picture of one of them. Just press slightly and after the notch in the support rod has cleared the retainer, the brackets (or the headrests) come right off.
Take each bracket, and reaching into the trunk from the inside of the passenger compartment and through the trunk pass-through, place the nylon upper end of the bracket into the hole in the parcel shelf that is directly above the little hole where the button came out. This picture shows the passenger side location. The bottom end of the bracket with the threaded portion should then fit right into the small hole. This might take a bit of fidgeting and grunting to make them align just right, and in my case, I had to move a speaker wire out of the way so the fiber panel wouldn't stand out too far from the bulkhead. After the threaded portion pops through the bulkhead attach the nut and tighten. Repeat for the other three brackets. This is what they look like installed from the inside, and what they look like in the trunk.
Time now to make the cut into the fiberboard parcel shelf cover. Take a new X-Acto blade mounted into a handle and carefully press it into the fiberboard. Using the bushing in the mounting bracket below as a guide, carefully cut away the material to make a hole for each of the four support rods. Be careful not to nick the nylon bushings or to cut away more than necessary.
Clean up your mess, grab your headrests, and guide each support rod through the parcel shelf holes and into the bushings and press down firmly until they all click into place. Done!
Reinstall the rear seatback by hooking the metal loops over the hooks--this is much harder to do going in than it was coming off, and you have to make sure the hooks have actually caught and the seatback is firmly set. Place the loops at the bottom back over the retaining tabs and bend them back down, then reinstall the bottom cushion. After all that, everything should look like this.
Now then--difficulties. Yes, there were some. Mostly in not realizing the best sequence of destruction and reattachment, and the nigglesome problems of making sure things were out of the way. If you have your stuff together and follow the outline above, this is maybe a thirty minute job. However, if you maybe try to be smart and cut a hole out first before you install a bracket, it might make things last a bit longer. If you have one of the seatbelt buckles caught up under the rear seatback cushion when you go to install the lower one, and have to nearly disassemble everything just to get it out, it can take longer. If it's a thousand degrees inside the car and you're already tired and brain-dead from being out cutting grass in the blazing sun, it can take longer. So, be sure to have plenty of water around. And don't be silly and have to do things twice.
The only lingering problem is the rear speaker grills--these are the nice big factory accessory speakers with the cheesy metal ring around them, and they're a bit too big to fit in the shelf alongside the rubber boots for the headrests. So, I'm going to have to do a bit of fabrication to fix a suitable cover for the grills. I'm not too worried about that, though.
posted by Terry at 8/16/2005 10:16:00 AM
![]()
![]()

2 Comments:
What? No Video?
Just shake your monitor up and down and sideways. And make loud gasping sounds. And say a mild bad word when you drop a 10mm nut down into the floor somewhere. That's pretty much it.
Post a Comment
<< Home