
Now then, The Enlightenment.
One of the things that is most troublesome about the '86 and later 240s are the crappy headlamps. They have plastic lenses, which isn't so bad, but the plastic deteriorates, and the pattern and quality of light just isn't that good.
SO, a while back, I did some searching around for something to use as an upgrade--basically, there seem to be two options. One is to attempt to find the downmarket headlight option for Volvo trucks of this vintage. They had the same big square plastic headlamps, but you could also get a credit by ordering with round lights. Since they plug into the same hole, the round lights should fit the 240 as well. The nice thing about the round ones is that high-quality halogen lights are available just about anywhere. Unfortunately, the truck parts aren't that common, and they still require some niggling to get right.
The other alternative is to get some European lamps, which offer the advantage of non-clouding glass lenses and better light output. I did some searching around, and found the instructions included on this post from the Brickboard to be the most comprehensive. Follow them and you should have no more trouble than I did, which is to say, darned little. In some subsequent searching, I also found this site, which is also pretty comprehensive and includes pictures, too, as well as a list of handy links. The Brickboard poster's instructions worked just fine, but the stipulation of using a long 10mm socket isn't quite accurate. Some of the mounting nuts require a variety of tools and silent cursing to get loose. The long 10 will work for most, but not all.
The lights were purchased from FCP Groton via Ebay and were around $350 or so. As others have noted, these are produced by DJAuto in Taiwan, and were purchased from Scan-Tech Sweden by FCP Groton, before they got to me. The quality is obviously not as good as with a Cibie unit, and I was a bit miffed that the FCP ad on Ebay seemed to indicate they were, in fact, Cibie units. Also, the required new H4 connectors do not come with the lamps, and this wasn't made quite clear either. But overall, they aren't the worst things in the world.
AND ANOTHER THING--European lights are not USDOT approved. If you have stringent state equipment inspections (Alabama has no inspections) you might run afoul of someone. However, from the looking around that I've done, this seems to be rare to the point of being a non-issue. HOWEVER, don't do it if you have any reservations about it. AND SECOND, the obligatory disclaimer: I am a moron. Do not do the things I do unless you are willing to endure possible serious injury or even mockery and derision from your friends.
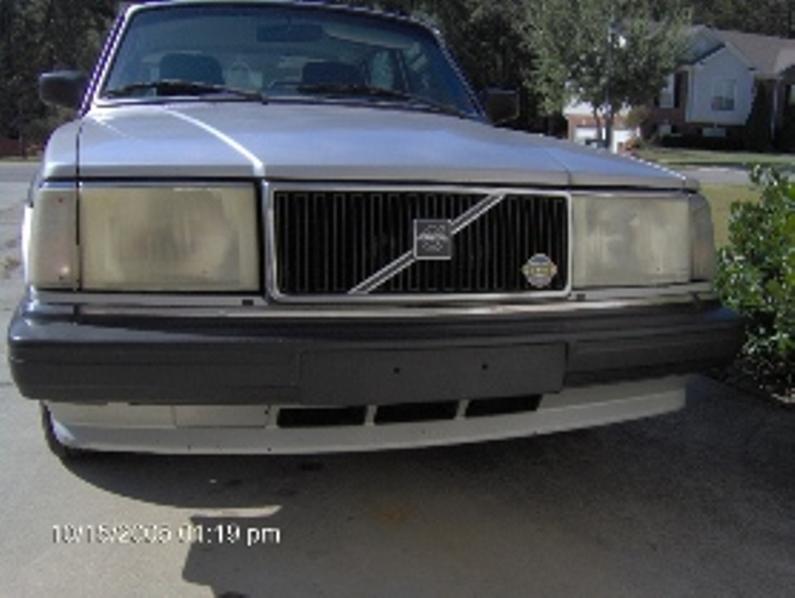
Anyway, to start, here's what it looked like before from the front:
 The worse side was the passenger side, with the sidemarker lens being the consistency of cellophane from exposure to sunlight. The lenses can be ordered separately, but there's no use to do that if you're changing everything out. Anyway, the before:
 Driver's side before:
 First, make sure you have all your junk and tools and stuff with you, then remove the grille. This involves turning the two quarter-turn fasteners on top, pulling them out, and then removing the grill. Lay it aside where it can't be injured when you fall on it. (Not that this happened to me, but it could have.)
Then, out with the battery, and this is what you see on the driver's side, except in real life there are no notes:
 This side is much easier to get at than the passenger side--the passenger side has the air conditioning drier in the way as well as the windshield washer jug, and the ground wire is back up behind the washer jug and is attached along with a host of other ground wires.
 Be sure and spray the mounting bolts with Liquid Wrench or other penetrating oil before you go to wrenching. In my case, it was unnecessary, especially so on the passenger side where the mounting nuts were only finger tight. Take off the nuts, then disconnect the ground wires, (driver's side shown)
 then unplug the turn signal connector (again, this is the driver's side):
 Carefully pull the lamp units toward you, taking care to thread the signal connector through the oval hole, and after you get both lamps out, this is what things look like--
 Interesting find of the weekend? Well, when I took the driver's side fixture out, there was a piece of dry-rotted cotton cloth stuck down in the corner. I have no idea why, although there was also a sticky strip of mastic under the light as well. Maybe something up front was squeaking or whistling? Who knows.
 Anyway, when you get all that junk out of the way, it's a good time to clean out the bugs and grease and dirt and such that collects over a 20 year period, then get to work on the next step, trying to get the trim pieces off the old headlights. These were nearly impossibly to get off and took several spritzes of the nut rust buster spray to get loose. The black plastic side pieces get reused on the new lamps.
Old lamps--
 New lamps--
 Then it's time for the precious (in the sense of outrageously costly) chromey plastic doodads. The screws on these were tight and I was trying my best not to break anything. I was successful in this effort. Surprisingly so.
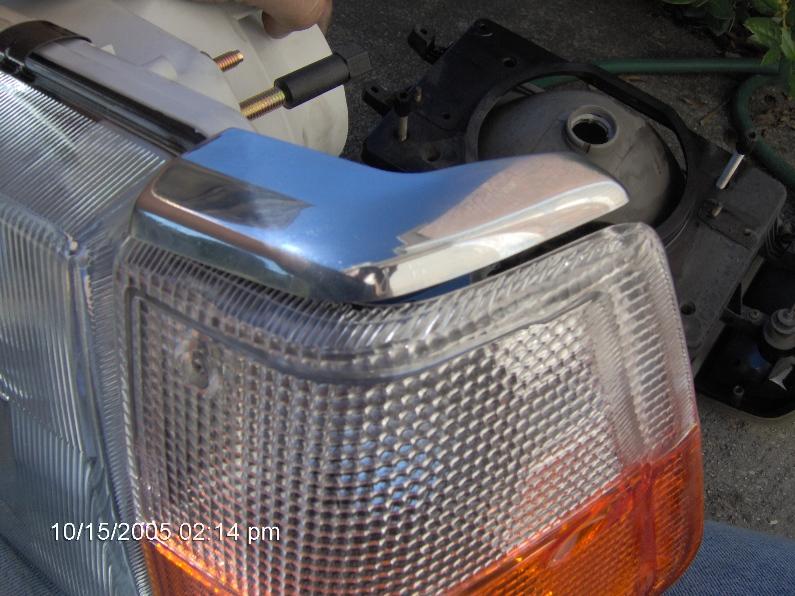
In case you're wondering, this is the reason you can't use the existing upper side chrome trim--the mounting holes are off.
 The guy who did the conversion on his wagon suggested using double stick tape to adhere these to the tops of the lamps, which might work, although the heat of the lights might cause the stickum to let loose. The "actually fit" Volvo factory trim pieces were ordered from Scandcar in Denmark, and should have been made of solid gold for what they cost. I sure wish Volvo would allow their US dealers to order junk like this rather than having to order it from elsewhere.
Then again, it'd probably be even more expensiver.
To make matters even less fun, the little pieces atop the side markers don't quite fit as they should, either. I don't know if this is the result of the aftermarket lack of quality on the sidemarker lights, or if there is a difference in the Euro-type trim piece as well. But it leaves a small gap at the top.
 Of course, the ol' brick is built with pre-Industrial Revolution-grade door, fender, and panel gaps and alignment, so it's really not noticeable. Except to me. Grr. Anyway, take the trim screws out of the old lamps, and attach the new and old chrome plastic and this is what you get--
 Carefully guide the adjusters and wires back through their respective holes on each side, tighten up the nuts, and this is the result--
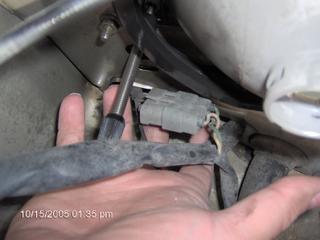
 Now then, the fun part, dealing with wiring and electricity. I really wanted to go the upgraded route with new relays and running straight off of battery power, and someday I will fix that. (Daniel Stern Lighting has all the relays and wiring diagrams you need for this project.) But I wanted to get these things in and working, and so I went ahead and took the cheaper route of simply swapping out the connectors. The H4-style connectors were purchased from AutoZone, along with a box of crimp connectors. Yes, again, I know it would be better to solder these things, and I will at some time in the future, but I do have a good set of crimping pliers and I have never had trouble with crimped connectors, so all of you Soldering Iron Soldiers please forgive my transgressions. Anyway, here's the connector--just remember, red to red, black to black, and blue to whatever ground wire color your type of connector has.
 While you are working on your headlights, it is best to have accompaniment in case you need something cold to drink. I recommend a small girl on a scooter.
 Now then, connect the connectors, install the H4 bulbs, being extraordinarily careful not to touch them with your fingers. Body oils can get on the surface and cause a hot spot and a bulb failure. So don't do that. After the bulbs are in place--
 --slip the big rubber doughnut seals over the back of the lamps with the base of the bulb sticking out a bit, dab some dielectric grease on the connectors and plug them in. Reconnect the turn signals, and the ground wires. The only trouble I ran into was that the driver's side ground wire was no longer long enough to reach to its original location, so I slipped it under the loop that holds the hood release cable.
Reinstall the grille, but don't put your tools up just yet. You have to check and make sure you've got functioning lights, and you might have to take something off again. I was lucky--I had one loose connection on the driver's side turn signal connector--when that was pressed home, it was fine. The passenger side still has something that's not quite right--I have a rapid flash, which tells me some juice is getting out somewhere. By the time I got back to working on it, it was dark, so this is another thing that'll have to wait. It works, after a fashion--it does light up, but it just blinks too fast. ANYway, this is what the new lights look like--
 Sweeeet. I could tell the difference immediately, even without them being aimed. And whatever was causing the passenger side high beam to disappear was fixed, too, so now I have full high beams. This is a shot of the rough aim of the lights, I still have to do an exact spot when I get more time to play.
 Even though the picture is a bit too light to see, the characteristic upward sweep on the right side is visible, and driving down the hill behind our neighborhood was quite a bit different than it usually is in that I could actually SEE THINGS! Amazing, I know. Anyway, aiming instructions can be found here, via Dan Stern's site.
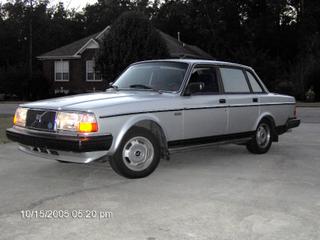
And finally, a shot of the old fellow looking quite dapper--
 Overall, the process doesn't take long--if you go by the time stamp on the pictures, it took about three hours, which included several breaks and time for chatting and picture taking and scratching my head to figure stuff out that wasn't in anyone's instruction sheets. It's not something to try if you don't have the tools or space to do it, but if you're the least bit handy, it goes quickly. If you know the difficulties ahead of time and plan for them, it could probably be done within two hours or so.
So, there you go.
SO, a while back, I did some searching around for something to use as an upgrade--basically, there seem to be two options. One is to attempt to find the downmarket headlight option for Volvo trucks of this vintage. They had the same big square plastic headlamps, but you could also get a credit by ordering with round lights. Since they plug into the same hole, the round lights should fit the 240 as well. The nice thing about the round ones is that high-quality halogen lights are available just about anywhere. Unfortunately, the truck parts aren't that common, and they still require some niggling to get right.
The other alternative is to get some European lamps, which offer the advantage of non-clouding glass lenses and better light output. I did some searching around, and found the instructions included on this post from the Brickboard to be the most comprehensive. Follow them and you should have no more trouble than I did, which is to say, darned little. In some subsequent searching, I also found this site, which is also pretty comprehensive and includes pictures, too, as well as a list of handy links. The Brickboard poster's instructions worked just fine, but the stipulation of using a long 10mm socket isn't quite accurate. Some of the mounting nuts require a variety of tools and silent cursing to get loose. The long 10 will work for most, but not all.
The lights were purchased from FCP Groton via Ebay and were around $350 or so. As others have noted, these are produced by DJAuto in Taiwan, and were purchased from Scan-Tech Sweden by FCP Groton, before they got to me. The quality is obviously not as good as with a Cibie unit, and I was a bit miffed that the FCP ad on Ebay seemed to indicate they were, in fact, Cibie units. Also, the required new H4 connectors do not come with the lamps, and this wasn't made quite clear either. But overall, they aren't the worst things in the world.
AND ANOTHER THING--European lights are not USDOT approved. If you have stringent state equipment inspections (Alabama has no inspections) you might run afoul of someone. However, from the looking around that I've done, this seems to be rare to the point of being a non-issue. HOWEVER, don't do it if you have any reservations about it. AND SECOND, the obligatory disclaimer: I am a moron. Do not do the things I do unless you are willing to endure possible serious injury or even mockery and derision from your friends.
Anyway, to start, here's what it looked like before from the front:
 The worse side was the passenger side, with the sidemarker lens being the consistency of cellophane from exposure to sunlight. The lenses can be ordered separately, but there's no use to do that if you're changing everything out. Anyway, the before:
 Driver's side before:
 First, make sure you have all your junk and tools and stuff with you, then remove the grille. This involves turning the two quarter-turn fasteners on top, pulling them out, and then removing the grill. Lay it aside where it can't be injured when you fall on it. (Not that this happened to me, but it could have.)
Then, out with the battery, and this is what you see on the driver's side, except in real life there are no notes:
 This side is much easier to get at than the passenger side--the passenger side has the air conditioning drier in the way as well as the windshield washer jug, and the ground wire is back up behind the washer jug and is attached along with a host of other ground wires.
 Be sure and spray the mounting bolts with Liquid Wrench or other penetrating oil before you go to wrenching. In my case, it was unnecessary, especially so on the passenger side where the mounting nuts were only finger tight. Take off the nuts, then disconnect the ground wires, (driver's side shown)
 then unplug the turn signal connector (again, this is the driver's side):
 Carefully pull the lamp units toward you, taking care to thread the signal connector through the oval hole, and after you get both lamps out, this is what things look like--
 Interesting find of the weekend? Well, when I took the driver's side fixture out, there was a piece of dry-rotted cotton cloth stuck down in the corner. I have no idea why, although there was also a sticky strip of mastic under the light as well. Maybe something up front was squeaking or whistling? Who knows.
 Anyway, when you get all that junk out of the way, it's a good time to clean out the bugs and grease and dirt and such that collects over a 20 year period, then get to work on the next step, trying to get the trim pieces off the old headlights. These were nearly impossibly to get off and took several spritzes of the nut rust buster spray to get loose. The black plastic side pieces get reused on the new lamps.
Old lamps--
 New lamps--
 Then it's time for the precious (in the sense of outrageously costly) chromey plastic doodads. The screws on these were tight and I was trying my best not to break anything. I was successful in this effort. Surprisingly so.
In case you're wondering, this is the reason you can't use the existing upper side chrome trim--the mounting holes are off.
 The guy who did the conversion on his wagon suggested using double stick tape to adhere these to the tops of the lamps, which might work, although the heat of the lights might cause the stickum to let loose. The "actually fit" Volvo factory trim pieces were ordered from Scandcar in Denmark, and should have been made of solid gold for what they cost. I sure wish Volvo would allow their US dealers to order junk like this rather than having to order it from elsewhere.
 Then again, it'd probably be even more expensiver.
To make matters even less fun, the little pieces atop the side markers don't quite fit as they should, either. I don't know if this is the result of the aftermarket lack of quality on the sidemarker lights, or if there is a difference in the Euro-type trim piece as well. But it leaves a small gap at the top.
 Of course, the ol' brick is built with pre-Industrial Revolution-grade door, fender, and panel gaps and alignment, so it's really not noticeable. Except to me. Grr. Anyway, take the trim screws out of the old lamps, and attach the new and old chrome plastic and this is what you get--
 Carefully guide the adjusters and wires back through their respective holes on each side, tighten up the nuts, and this is the result--
 Now then, the fun part, dealing with wiring and electricity. I really wanted to go the upgraded route with new relays and running straight off of battery power, and someday I will fix that. (Daniel Stern Lighting has all the relays and wiring diagrams you need for this project.) But I wanted to get these things in and working, and so I went ahead and took the cheaper route of simply swapping out the connectors. The H4-style connectors were purchased from AutoZone, along with a box of crimp connectors. Yes, again, I know it would be better to solder these things, and I will at some time in the future, but I do have a good set of crimping pliers and I have never had trouble with crimped connectors, so all of you Soldering Iron Soldiers please forgive my transgressions. Anyway, here's the connector--just remember, red to red, black to black, and blue to whatever ground wire color your type of connector has.
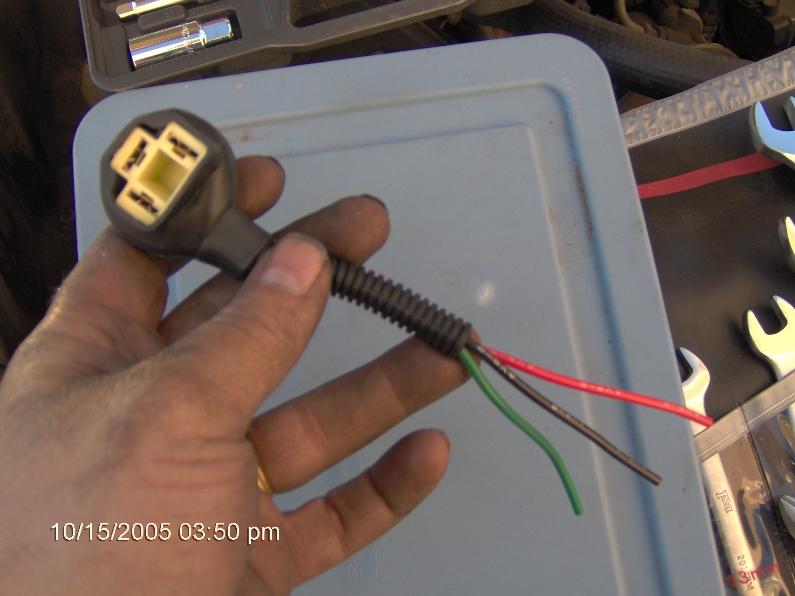 While you are working on your headlights, it is best to have accompaniment in case you need something cold to drink. I recommend a small girl on a scooter.
 Now then, connect the connectors, install the H4 bulbs, being extraordinarily careful not to touch them with your fingers. Body oils can get on the surface and cause a hot spot and a bulb failure. So don't do that. After the bulbs are in place--
 --slip the big rubber doughnut seals over the back of the lamps with the base of the bulb sticking out a bit, dab some dielectric grease on the connectors and plug them in. Reconnect the turn signals, and the ground wires. The only trouble I ran into was that the driver's side ground wire was no longer long enough to reach to its original location, so I slipped it under the loop that holds the hood release cable.
Reinstall the grille, but don't put your tools up just yet. You have to check and make sure you've got functioning lights, and you might have to take something off again. I was lucky--I had one loose connection on the driver's side turn signal connector--when that was pressed home, it was fine. The passenger side still has something that's not quite right--I have a rapid flash, which tells me some juice is getting out somewhere. By the time I got back to working on it, it was dark, so this is another thing that'll have to wait. It works, after a fashion--it does light up, but it just blinks too fast. ANYway, this is what the new lights look like--
 Sweeeet. I could tell the difference immediately, even without them being aimed. And whatever was causing the passenger side high beam to disappear was fixed, too, so now I have full high beams. This is a shot of the rough aim of the lights, I still have to do an exact spot when I get more time to play.
 Even though the picture is a bit too light to see, the characteristic upward sweep on the right side is visible, and driving down the hill behind our neighborhood was quite a bit different than it usually is in that I could actually SEE THINGS! Amazing, I know. Anyway, aiming instructions can be found here, via Dan Stern's site.
And finally, a shot of the old fellow looking quite dapper--
 Overall, the process doesn't take long--if you go by the time stamp on the pictures, it took about three hours, which included several breaks and time for chatting and picture taking and scratching my head to figure stuff out that wasn't in anyone's instruction sheets. It's not something to try if you don't have the tools or space to do it, but if you're the least bit handy, it goes quickly. If you know the difficulties ahead of time and plan for them, it could probably be done within two hours or so.
So, there you go.
posted by Terry at 10/19/2005 08:23:00 AM
![]()
![]()

7 Comments:
Well where to begin? My assistant/supervisor whenever I have an auto hood in the up position is usually my nearly white cat Uinta. He's pretty interested in the use of tools and is eagerly awaiting his opposable thumb upgrade so he can pass tools and learn to do stuff on his own. He's not quite as entertaining as a girl on a scooter but he is generally good companionship. If only I could get him to fetch coffee refills or cold beers...
As for that fast blinking signal- that's normally a sign that there's a burned out bulb at the other end of the car. But I suppose you knew that and checked it out already, right?
Really nice work on the post BTW. Much better than my scooter mod photos!
Oh, you flatterer!
As for the fast blink, yep, I checked and all the bulbs are burning, but I have a loose connection in the turn signal plug. You can fidget with it and it'll blink on and off and junk. I'll have to take it loose again and make sure all the wires are pressed home. Same thing on the driver's side was causing the upper light not to work.
Good job! He looks much better. I just wiped mine down with a little WD40 which provided some improvement by getting the road scum off and filling in some of the crackles. And it's true -- there's some great stuff on E-Bay but care is required, and constant communication with the seller if necessary.
My cat never even waited for her opposable thumb. If she could pick it up, she delivered it -- the funniest one was the large vise grips. She would pick it up in the closed position, often drop and then leap three feet into the air when it popped open. I was mean. I kept closing them again.
And thanks for the detailed info. I am going to keep this handy for future reference.
I really could have used a mechanic cat. Sometime in the process, I dropped a socket, and of course, it landed in the splash shield, and, of course, it was too big to use my spring-loaded claw grabber, and too heavy to use my collapsible-magnet-on-a-stick to retrieve it from the topside. I managed to scoot it out from the back side of the pan by crawling under there and jiggering with it until it rolled out.
Your assistant/girl on a scooter is cute as always. I think she'd be the much more handy kind of Cat, if you want a cold Diet Coke. Though I suspect she talks a lot more than Nate's cat, which might make her less useful when you are working on stuff.
Volvo-y goodness isn't quite as good as possumy goodness, but it does in a pinch.
She was handy for fetching Diet Cokes, but she was also distracting in that she kept getting too close to the street on her scooter. But, boy, she sure had fun.
Post a Comment
<< Home